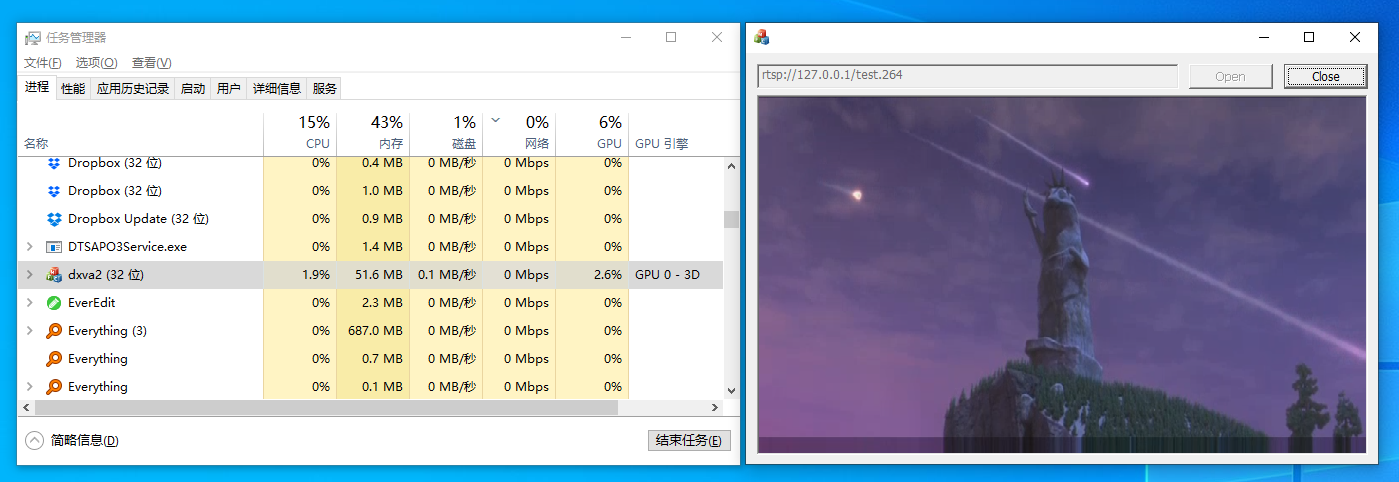
使用 FFmpeg 播放高分辨率视频时,画面渲染效率是影响性能的主要原因,好在 FFmpeg 提供了各种硬件解码 / 加速的方案,可以极大的降低系统负载。
在 Windows 平台下常用硬件加速方案 dxva2。
网上已经有了一些使用 FFmpeg 实现 dxva2 硬件加速的文章,一般是通过手动配置 dxva2 解码器实现的(ffmpeg_dxva2)。
实际上现在 FFmpeg 可以通过搜索解码器的方式指定 dxva2 加速,本文就对这种方式进行说明。
查找、初始化硬件解码器
 1
 2
 3
 4
 5
 6
 7
 8
 9
10
11
12
13
14
15
16
17
18
19
20
21
22
23
24
25
26
27
28
29
30
31
32
33
34
35
36
37
38
39
40
41
42
43
44
45
46
47
48
49
50
51
| std::string dec = "dxva2";
AVHWDeviceType device_type = av_hwdevice_find_type_by_name(dec.c_str());
if (device_type == AV_HWDEVICE_TYPE_NONE)
{
LOG(INFO) << dec << " is not supported, available devices are : ";
while ((device_type = av_hwdevice_iterate_types(device_type)) != AV_HWDEVICE_TYPE_NONE)
{
LOG(INFO) << av_hwdevice_get_type_name(device_type);
}
throw std::runtime_error("find hwdevice failed");
}
for (int i = 0;; i++)
{
// 检查硬件加速器是否支持当前视频流
const AVCodecHWConfig * config = avcodec_get_hw_config(codec, i);
if (!config)
{
LOG(INFO) << codec->name << " does not support device " << av_hwdevice_get_type_name(device_type);
throw std::runtime_error("get hwdevice config failed");
}
//找到硬件加速器支持的的颜色空间
if (config->methods & AV_CODEC_HW_CONFIG_METHOD_HW_DEVICE_CTX && config->device_type == device_type)
{
m_hw_pix_fmt = config->pix_fmt;
break;
}
}
// 解码器上下文
video_codec_ctx = avcodec_alloc_context3(codec);
avcodec_parameters_to_context(video_codec_ctx, in_video_stream->codecpar);
av_opt_set_int(video_codec_ctx, "refcounted_frames", 1, 0);
video_codec_ctx->thread_count = 1;
video_codec_ctx->opaque = this;
video_codec_ctx->get_format = get_hw_format;
if (hw_decoder_init(video_codec_ctx, device_type) < 0)
{
throw std::runtime_error("init hwdecoder failed");
}
if (avcodec_open2(video_codec_ctx, codec, NULL) < 0)
{
avformat_close_input(&format_context);
throw std::runtime_error("init decoder failed");
}
|
 1
 2
 3
 4
 5
 6
 7
 8
 9
10
11
12
13
| static AVPixelFormat get_hw_format(AVCodecContext * s, const AVPixelFormat *pix_fmts)
{
RtspThread * rtsp_thread = (RtspThread *)s->opaque;
const enum AVPixelFormat *p;
for (p = pix_fmts; *p != -1; p++) {
if (*p == rtsp_thread->m_hw_pix_fmt)
{
return *p;
}
}
return AV_PIX_FMT_NONE;
}
|
hw_decoder_init
 1
 2
 3
 4
 5
 6
 7
 8
 9
10
11
12
13
14
15
16
17
| static int hw_decoder_init(AVCodecContext * ctx, const AVHWDeviceType type)
{
int err = 0;
RtspThread * rtsp_thread = (RtspThread *)ctx->opaque;
AVDictionary * options = NULL;
av_dict_set_int(&options, "debug", 1, 0);
if ((err = av_hwdevice_ctx_create(&rtsp_thread->m_hw_device_ctx, type, NULL, options, 0)) < 0)
{
LOG(INFO) << "Failed to create specified HW device";
return err;
}
ctx->hw_device_ctx = av_buffer_ref(rtsp_thread->m_hw_device_ctx);
return err;
}
|
以上是初始化 dxva2 硬件加速器的代码
通过 dxva2 解码得到的 AVFrame 的 format 为 AV_PIX_FMT_DXVA2_VLD 类型,视频画面保存在 frame->data[3] 中,是 IDirect3DSurface9 指针类型
接下来的问题是如何将其渲染到窗口中
通过分析源码可以得知,FFmpeg 将 D3D 相关信息存入了 AVCodecContext 中,通过以下方式获取:
1
2
3
| AVHWDeviceContext * device_ctx = (AVHWDeviceContext*)video_codec_ctx->hw_device_ctx->data;
DXVA2DevicePriv * priv = (DXVA2DevicePriv *)device_ctx->user_opaque;
IDirect3DDevice9 * d3d9device = priv->d3d9device;
|
拿到 IDirect3DDevice9 以后就能通过 StretchRect 将 IDirect3DSurface9 渲染到窗口中了
1
2
3
4
5
6
7
8
| IDirect3DSurface9 * surface = (IDirect3DSurface9 *)frame->data[3];
IDirect3DSurface9 * back = NULL;
d3d9device->BeginScene();
d3d9device->GetBackBuffer(0, 0, D3DBACKBUFFER_TYPE_MONO, &back);
d3d9device->StretchRect(surface, NULL, back, NULL, D3DTEXF_LINEAR);
d3d9device->EndScene();
d3d9device->Present(NULL, NULL, m_hwnd, NULL);
back->Release();
|
经过测试,CPU 压力的确大大降低了

